Thursday, January 26, 2012

Project #7: The DIY Tank Top Dress

OK, sorry about that. I know I promised you a tutorial on Tuesday, but I got home from work and my lovely husband was hogging the computer, so I went to bed. However, here we are on Thursday at 5:18 AM and I'm ready to share. (Yes, readers, my devotion is great!)

Here are the supplies:
1 old tank top
elastic
fabric
coordinating thread
that's all!!!

I apologize that there aren't pictures for every step of the process (really for any of the steps), but I wasn't sure how this was going to work out and figured I'd take pictures of the next one. If I do another, which I'm sure I will, I'll add those pictures to this entry so you can see the process start-to-finish.

This tank top was from Target, but I've had it forever, I never wear it, and it's waaaaaaaay too tight around the stomach.
The elastic is 2" wide black elastic that cost about $0.92/yard. The fabric was $6.99 a yard, I believe, but I LOVE it.
And it perfectly matches the tank top. And it has hot pink in it, so I can use leftovers with hot pink and black!
Step 1: Try on your tank top and figure out where you want your waistband to sit. About an inch below that, make a little dot or other mark.

Step 2: Cut your tank top where you made the mark, the whole way across. I used a cutting mat, ruler, and rotary cutter, but you can use scissors if you're confident in your ability to go straight!
Maybe I just have a big butt, but you definitely want to go SHORTER than what I did here. I actually made the dress TWICE because the bodice was way too long the first time. Plus, when it was sewn to the elastic for the waistband, everything got really bubbly and I do NOT need extra bulk added to my lower half. For the final version I ended up cutting it at the narrowest part... see it? That might be a great rule of thumb.
Step 3: Hem your tank top. Just fold it over once and sew to make sure no edges fray.

Step 4: Fold the bottom over one more time, then pin the right sides of your tank and elastic together. These tanks should be stretchy by nature, but you'll obviously need to stretch the tank to get the whole way around the elastic.

TIP FOR MEASURING ELASTIC:
I did this 2 ways and found the elastic worked better and made for a more flattering dress when I cut it to a length that fit snugly around my waist when I gave it just a little stretch! If you don't stretch it at all when you measure, it will just kind of hang there. But you also don't want to stretch it the whole way, or it won't have enough extra stretch for you to get your dress on and off.

Step 5: Once your elastic and tank are pinned, sew them together. I used a zig-zag stitch and went right on the edge of the fabric and elastic. I feel like the zig-zag was more secure than just sewing a straight line... but do it however you want. I also stretched the elastic and fabric while I sewed so that the thread didn't get sewn in UNstretched, because then you'd never have any stretch to your actual dress.

     ***Don't forget to leave a little extra elastic at the ends, lined up with a seam in your dress when you start step 5. After you sew the whole way around, you'll want to pull the raw edges of the elastic together and sew it shut. Obviously, you'll want the seam on the inside. I did a zig-zag stitch down the elastic TWICE for added security.

Step 6: Time for the skirt! I cheated a little bit because of my big butt. The first time around, I just used a tube for the skirt, but it definitely bubbled and made me look like a Cinderellian stepsister. You don't need a pattern to do this... you just need to cut the skirt in a slightly trapezoidal shape. (Fabric matters, here. I used a quilting fabric, but a jersey knit might have been much easier!)
How do you like my "paint" job? Just cut the top a little narrower than the bottom, but about a foot larger than the waistline where the top will sit. So if the waistband of the dress is sitting at a part of you that's 32 inches, cut the top of the skirt to about 44 inches. The bottom should be about 6 inches wider than that.
(Keep in mind that the top of the skirt needs to fit over your bust, so if your bust is larger than 1 foot more than your waist, just cut the top of the skirt to fit the bust measurement, plus an extra inch or two.
Step 7: With the right sides of your skirt together, sew each side seam. Again, I did a zig-zag stitch and then an extra straight stitch for security... I plan on wearing this to work and don't want a wardrobe malfunction!

Step 8: With your skirt inside out, fold the top over once and sew around the top. This will help prevent fraying fabric.

Step 9: Take the top half of your dress and put the right side together with the right side of your skirt fabric. align the side seams of the tank top and skirt (your elastic should only have one seam). Fold down your skirt fabric again to hide your raw edge. Pin the right sides of your top and skirt together. Don't forget that you'll need to stretch the elastic to get the whole way around the skirt. When you're done, your fabric will fold and wrinkle along the elastic, and that is what you want!

Tip: Pin the sides at the seams first. This way you don't over- or under-stretch your elastic when you pin the rest of it together.

Step 10: Sew around the waistband, being sure to stretch the elastic until your fabric is flat. This will give your thread that "stretch" that it needs to allow you to get the dress on and off. Again, I used the zig-zag stitch.

Step 11: With your dress inside out, sew a hem along the bottom of the skirt. I folded mine twice and sewed once. My fabric was prone to fraying and doing the double hem will ensure that I don't have strings hanging out at the bottom of my dress.

PHEW! That was a lot of work! It was pretty quick and easy though... it took about the same amount of time as going to the store, trying on a few dresses, and coming home empty handed because you couldn't find the right color, size, pricepoint, etc.

Ready to see what you've accomplished?


Here it is! I added a necklace and ankle boots... but if I was going to wear those boots with it it would be with leggings or tights. In the summer I'd wear it with cute flats or flip flops.
There is also a little flower on the one strap... I will add a tutorial for those later!


Here I added a long cardigan and a skinny belt around the whole thing to "dress it up" and make it more winter appropriate. The tank is lowcut, which is why I never wore it, so I added a lace-trimmed cami underneath. I have a really wide belt that I would wear with this too, even though it certainly doesn't need one. You can use a t-shirt (short or long-sleeved) for this project too. I am planning on wearing a long-sleeved t-shirt under this in the spring and fall.

There are so many great options with this simple, inexpensive dress! I can't wait to make a long-sleeved style with a black shirt that I have... and I have a great black and white fabric for the skirt... it will look adorable with red shoes and yellow accessories. This is also a great way to upcycle old shirts with holes, stains, or rips in the lower half. Or if you're tall and shirts just aren't long enough, this is a great way to keep and reuse them!

I hope you enjoyed this tutorial. As I said, once I do another one of these I'll add more pictures so you can see the steps!

Inspired by Pinterest: Inspiration I and Inspiration II

Monday, January 23, 2012

A little update...

There's good news, and there's bad news.

Good news is, I have been at the gym a lot more recently.
Bad news? Less time to craft and update.

In other good news, I FINALLY finished my DIY tank top dress today.
Again, with the bad: I took 1 picture AFTER the whole thing was finished.

I do plan on updating tomorrow with the tutorial for the tank top dress tomorrow.

Tonight we went to JoAnn Fabrics (ours is expanding... YAY!) and bought some great fabrics that match our bedroom. I am going to make a quilted bed runner/foot warmer, since Jeff's feet are always so cold. I can't wait. It should be interesting, as I've never quilted before. I figure, if I mess it up, I can always turn it into a pillow. And the bright side is, the fabric would only really match the bedroom, so if the project looks hideous, no one but Jeff and me will ever see it. (See? That's what you call a silver lining!)

I'm thinking I might go with my grandma to her quilting get-together at my old church on Wednesday night. That would be a great chance to learn from some experienced women and spend valuable time with my grandma.

I'll update with the dress tutorial tomorrow, and I'll be sure to keep you posted on the quilting project!!!

Monday, January 9, 2012

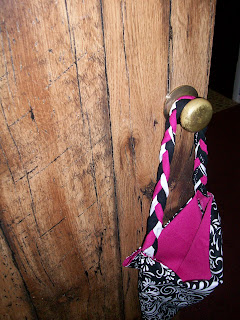
Project #6: The braided-strap purse

I wanted to make some nursing wraps to sell on Etsy, and found some great neutral (read: black and white) fabric to use for them. This was all last year, around July. The fabric has been sitting in my craft area since then and I haven't even looked at it. A few days ago I decided to make a dress (that will be project #7) and needed some fabric to use. I decided to browse through my stock pile of fabric instead of buying more at the store and came across a beautiful print. Then I made a trip to JoAnn Fabrics to find a lining for it. I had become selfish and decided to save the gorgeousness for myself, instead of giving it away. At JoAnn's, was unable to find a solid lining suitable for the print, so I re-raided my supply and found this gem (here are both pieces together):

Mmmmm. Love them together!
But I didn't need the trim at the top, so I used my rotary cutter and trimmed it off. I figured I'd use that later. (You'll see!!!)

I cut the printed fabric to the size I wanted for my purse, and used that as the "pattern" for my hot pink fabric. I didn't worry about the uneven edges or anything because I was going to sew it and could straighten it out in the sewing process. I was going for speed because it was late on a Thursday night and I wanted to use it for a job interview on Friday morning.


I put the right sides of the fabrics togethr and sewed the whole way around, leaving just a small unsewn part so I could turn it right side out. (Sorry I don't have pictures... I didn't want to overload the post with photos, and I'm working on the assumption that this step is pretty self-explanatory. Just sew!) I kept the tiny unsewn part unsewn until I was ready to form the bag shape.

For the strap, I wanted to braid 3 strands: Black, White, and Hot Pink.
This is where the trim on the printed fabric comes in.

Since the trim had a large section of black fabric, then 2 strips (1 black and 1 white) that together were the same size as the solid black part, I cut it right along the edge of the white fabric that separated the white from the large black section (confused yet?) Then I cut a strip approximately the same width of the hot pink fabric. This is where I insert my plug for rotary cutters. They are amazing! They are major time savers and they don't hurt your hand like scissors do!

I took one strip of fabric, folded it in half (right sides together), and sewed up the long side. I kept the ends unsewn. Then I folded one end backwards over the rest of the tube and fed the long part through, turning it right side out. (Repeat for all 3 strips of fabric).

I then flattened the fabric with the seam down in the middle. I ironed the fabric then to try to keep the seams in the back instead of on the sides.

For the braided strap, I layered the strips on top of each other and secured with a pin. Then I put the end under my sewing machine (hey, I needed a place to secure it. Don't judge. Secure however you're able.). Then braid. Make the braid as tight as possible, leaving about an inch at the bottom. When the braid is finished, layer the strips again and pin together. You can adjust the braid if necessary, for spacing purposes, etc.


Now I set the braid aside and formed the bag shape. Just like when I put the lining with the bag, I put the right sides of the print together and sewed up the sides, (the bottom was the folded edge: no sewing needed) and made sure to include the unfinished edge from earlier. (The unfished edge from earlier was folded so the raw edges were inside and not fraying all over the place.)

To add the straps, I just sewed the ends to the seams of the bag, so the strap goes across the whole bag. (This was mostly because I didn't have enough solid black and white fabric to make two braids for two handles.)


TA-DA!!!

Sunday, January 1, 2012

Project #5: Cell Phone Charging Station

I love the idea of having a set place for charging my cell phone, and the gift shop where I work sells these. But they're plastic and minimal, and I hate to spend money on something so basic, so I decided to make my own. I got the hubs involved in it, too! I found the tutorial on here, on my new favorite blog, and went from there.

First, your supplies: 2 empty bottles, cleaned out and air-dried (it worked best to rinse them and then thoroughly clean them once they were cut open.) A blade, sand-paper, and of course, Mod Podge and a sponge brush.
(***We had 2 bottles because we were both making a holder. You obviously only need 1.***)

Now, the steps:
1) Decide how high you want the front of your holder
to be on your cell phone. Draw a line.


2) Decide how high you want the back to be, and 
draw a line there, too. Remember, your plug will
most likely be right over your phone,
so make it high enough that the plug and phone
don't get in each others' way.

3) Using your blade, cut along the lines you drew.

4) This is about what it should look like
when you're done cutting.

5) Draw a cutout area for your charger's plug.
It should be just big enough for your charger
to fit through.

6) Cut out the hole for the plug.

7) Using sandpaper, sand down all edges until smooth.
Also, sand entire area of bottle so ModPodge
will adhere more easily.


8) Apply a generous amount of Mod Podge and wrap fabric TIGHTLY
around entire holder. STRETCH FABRIC is a bad idea.
Be sure to pull fabric tight at the bottom, or bubbles and wrinkles
will occur. Start wrapping fabric from front to back so
pattern is flat on front, and pulling doesn't distort the most
visible area of your holder.

9) Cover entire project in a thick layer of Mod Podge.


10) Using scissors or your blade, cut out the fabric around the hole
for your charger plug. Apply an extra layer of Mod Podge and let dry.

Ta-Da! You're done!

Enjoy your new creation...

It keeps your cords and phones off the floor, and even if you
kept your phone or iPod on a nearby table, you still don't
have to worry about the dangling cords!