Saturday, April 7, 2012

Project 13: Happy Easter cake!

Looking for a festive dessert for an Easter gathering? This cake is simple, fun, and delicious! Just grab your favorite boxed cake mix or cake recipe, some whipped vanilla icing (I like Betty Crocker's), a Peeps Bunny, some jelly beans, and green food coloring, and you're set!

Step 1: Prepare the batter as directed. Divide between two 8" pans. I always use the springform pans (or cheesecake pans) because the cake releases a little more easily from the sides. Bake according to recipe instructions and cool.

Step 2: Level both round cakes. This will make the assembly easier.

Step 3: Add approximately 24 drops of green food coloring to make the "grass" color. You can try to make more to make it a darker shade. Mix.


Step 4: Apply a thick layer of icing over the bottom later of the cake (once the bottom layer has been placed on the plate of your choice!)


Step 5: Using a wide flipper, wax paper, or your hands, transfer the other round cake to the iced layer you already have. To ensure the top layer won't break, build up any extra space around the edges of the bottom layer with additional icing for support. Ice entire cake: top and sides.

Step 6: With some jelly beans (the Starburst Jelly Beans are good!), create a ring around the bottom of the cake. It can be continuous or it can be broken up, since not everyone will eat them. Add a few on top for an "egg hunt theme."


Step 7: The finishing touch. Take a toothpick, drinking straw, or bamboo skewer, and stab your Peep Bunny's bottom, up as far as you'd like, though I'd try to get up to his neck. Leave at least 2 inches sticking out the bottom, and insert that end into the center of the cake.
Ta da! Easter cake! Super quick and easy!
If you can find little accessories, like miniature baskets (from a dollhouse maybe?)
to put on there, even better!

HAPPY EASTER!


Friday, April 6, 2012

Project #12: Spring Bouquet

In preparation of our upcoming craft show gig, I'm trying to make a variety of items that will hopefully draw a large crowd to our table! I figure a little tray full of earrings doesn't really scream for attention.

I decided to try my hand at floral arrangements, and am pretty pleased with the prototype!


This is a VERY simple project. I used a pair of scissors, some craft/tacky glue, a ceramic vase, ribbon, a small cube of styrofoam, and some floral stems and bunches.
Total cost was $7.50 (not including the glue, scissors, and ribbon, which I already had from other projects.)

Allow me to add this comment: someone recently said to me, "Don't take this the wrong way, but I really hate people like you. I am not crafty at all!" I really wish people wouldn't say things like that! There are so many simple projects out there that are fun and easy and look WONDERFUL. This is one of those projects, so if you are looking forward to diving into your first crafty endeavor, this would be a great one to start with!

Materials:
3x3 cube of styrofoam (this size will change based on the shape and size of the vase you're using.)


Vase. I selected one that is about 8"x4" so that the flowers wouldn't overpower it. I was afraid anything smaller would have been a) overwhelmed by flowers and b) harder to work with.

Flowers! I love pink with aqua, and these were perfect for my taste! (Plus, daisies are kind of "my" flower.)


Filler flowers are important, too! I have coordinating smaller flowers and some baby stems of leaves.
The leaves were just for backup, in case the styrofoam showed. I ended up not having to use them, but I can always save them for the next time! (Spanish Moss would be great too!)


STEP 1: Style your flowers as you would like. I chose to spread mine out for more dimension and to alternate the colors a little bit more. After the bunch is styled, press it into your foam as far as possible without poking through the other side.

Step 2: Layer the bottom of your vace with tacky glue.
(Hot glue can melt the styrofoam, so I don't recommend using it or anyting like E6000. Tacky glue will work just fine!)
Insert the foam cube while glue is still wet. By inserting the cube now, you'll be able to see where to put the other, smaller stems.


Step 3: Separate smaller pieces from your filler bunch. You can use wire cutter to trim them at their individual bases. If you don't have wire cutters, like I don't, you can bed the stem back and forth until the wire breaks itself, then use your scissors to cut through the coating. Then you can fluff/style the smaller bushels as well.


Step 4: One by one, insert the smaller bushels into the foam core in the vase.
Be sure to fill in any holes or gaps, especially those where the styrofoam might be visible through the petals.
Since the stems are wire, they should go easily into the foam.

Ta-Da! Take a moment to pat yourself on the back and admire your project!
You can certainly end here, if your vase or flower pot is colorful, or if you like the single color.
However, that's not my style. I like LOUD and bright!

My vase needed something more.
Step 5: Feel free to use the tacky glue again to add a ribon trim at the top, the bottom, or anywhere in between.
Hot glue SHOULD also work here, but since it has a more extreme texture, I prefer to use the tacky glue.
 It's completely your choice!

Finally, Step 6: Add any other trim you'd like to the project! I chose an accent trim, since the first ribbon was so wide. You can add buttons, twine, whatever you'd like! Just make it unique and special to you!


I hope you enjoyed the tutorial and are able to create something you love! This is such a great, simple, quick project that you can do for each season (or, if you'd like, each holiday!)

I hope to do another soon with a black vase and a peacock feather, with some other teal and plum colored flowers, though I worry it will be a little too dark. I'll be sure to post though, if I end up doing it!

I'd love for you to share your finished products with me so I can see them!


Sunday, March 25, 2012

Update

WOW. So I realize it's been about a month since I've posted anything. I've made one new project in that time, and I have no excuse other than the fact that I am lazy.

My goal is still to have 52 projects by the end of 2012, so I guess I'm going to be going crazy this summer and fall to make up for my laziness now.

I could blame my new job (which is awesome!), but when it comes down to it, I'm home more than I'm at work and really have no excuse. I am, however, purchasing new supplies to make awesome new projects, and I will definitely post about them as I can!!!

Tuesday, February 28, 2012

Project #11: Super Simple Flap Wallet

Remember that easy purse from Project #10? Well, this project is going to give you an even easier pattern to create a wallet that will go with that purse!


Step 1: The pattern is just a piece of paper, with part of it trimmed, so that it is about 6 x 11. You'll fold it "hamburger" style, with two folds, so that you'll have what looks like an envelope and a flap.

Step 2: Use that pattern (laid out straight) to cut out 1 main fabric piece and 1 lining piece. You'll also need to cut a piece of interfacing (for strength in your wallet) that is just a tiny bit smaller (about 1/4 inch on each side).

Step 3: Iron on the interfacing to the main fabric.

Step 4: Now you should have a lining with NO interfacing, and your main fabric that has the interfacing on the wrong side.

Step 5: Attach a button about 2 inches from the bottom of the right side of the main fabric.

Step 6: It's hard to see here, but in the center of the end opposite the button (on the main fabric), pin a small loop of elasticized cord. This will be your button loop.

Step 7: Pin the right sides of the lining and the main fabric and sew around 3 of the 4 sides.
(I didn't sew the end with the button, but I sewed the other 3 sides.)
Trim the edges close to the seams.

Step 8: Turn the wallet right-side-out

Step 9: On the open end, turn the raw edges inside and straight stitch across, so the raw edges are hidden.  

Step 10: Fold the end with the button up toward the other end (the end with the loop is the flap).
Straight stitch the entire way around the wallet.

Step 11: Fold the flap over and you're done! I ironed my flap fold to make it a little stiffer.
This is something I wouldn't use for coins, but it's great for cash, credit cards, and coupons!
Enjoy!

***DISCLAIMER*** I know I'm talking about how easy these projects are and then my actual wallet has crazy stitching issues.... that's not a pattern problem, it's the machine. It's currently in a time out and I am looking for a replacement that will behave and stitch correctly.

Monday, February 27, 2012

Project #10: Handy Little Handbag

OK, friends. This is truly the easiest bag to make. Ever. Unless you have a magical way of making bags that require no sewing and no cutting, this "pattern" can't be outdone in terms of simplicity! It can be reversible, or you can add pockets. This is the bag in its simplest form, but there are sooooooo many things you can do with it.

You're going to need about 1/2 yard of 2 coordinating fabrics... and that will allow you to make about 2 or 3 purses, or a purse and coordinating wallet, plus a little extra. It's awesome.

I will also use this into to offer an apology for the fact that this is going to get confusing if you're an overly visual learner like me. I made two of these bags, and took pictures of both, so you are going to see some steps from both bags, so apologies if the constantly changing color scheme confuses you.

Here we go!


Step 1: Creating the Pattern.
Take a piece of computer paper (8.5x11)
Round off the two bottom corners.
There's your bag pattern!

Step 2: Using your "pattern," cut two each of your lining fabric (the black and yellow stars from the first picture, and the brown fabric here) and your bag's main fabric (the black and yellow scrolls or this awesome circle fabric).

Step 3: Cut a piece of fabric about 4x24. This will be your strap.

Step 4: Fold your strap fabric in half, right sides together. Sew along the raw edge, leaving the ends unsewn.
This will give you a "tube." You'll want to turn the tube inside out, so the right side of the fabric is out.

Step 5: Take your right-side-out strap fabric and fold it in half again. Sew up each side with a straight stitch.

Not pictured
Step 6: Put your lining pieces right-sides-together and sew along the edge, along the sides and bottom. Leave the top unsewn.
Put your bag's outer pieces right-sides-together, and do the same.  

Step 7: We're going to add a button now! To strengthen the fabric, I recommend using a small piece of interfacing.
My interfacing is great... it irons on and is a heavier weight, so it will make the fabric much sturdier than a light interfacing.
All you have to do for the button is attach a small square, right where your button will go, on your OUTER FABRIC ONLY! Attach the interfacing to the WRONG side of the fabric. The iron-on kind definitely works best for this, but there's no law saying you can't sew it on. You want to do this before adding your lining so that the stitching for the button isn't visible through all the layers of your bag.

Step 8: Then sew on your button! (This is obviously the back of the button.)

Step 9: Admire your button's prettiness.
(Go on, you deserve it!)

Step 10: There are a few ways to attach the lining to the bag. I think the easiest way is to insert your lining into your bag (make sure the seams of your lining are trimmed CLOSE so that it doesn't have weird wrinkles in it when you assemble the bag.) You can just have your bag right-side-out, and have the lining right-sides-together, so that when you put it inside your bag you don't see any bad sides.
I promise, it does make sense.

Then, just fold in the top edges the whole way around and sew 2 straight-stitch lines the whole way across, inserting the straps between the lining and main fabric at each end.

You will want to add a 3-inch piece of elastic cord (folded over into a loop) in the side of the bag opposite your button. Use a small stitch so the cord is securely in the seam, and backstitch a few times over it for extra security. (I didn't do that and I used a larger stitch size and my loop came out the first time I stretched it.)

Sorry... of course I forgot to take pictures during that whole part because I was so excited that I was almost done! I'll be making more soon and uploading those pictures as soon as I have them... probably not until the weekend though.

Pretty much, if your bag has a strap, a button, and a loop, and you can't see any raw edges, you did it right.

Ta-Da! My finished bag! You can see the button loop sticking up there.
I'm terrible with button holes, so the loop is MUCH easier for me, and I think it's adorable.
I hope you enjoyed this tutorial and that you are able to enjoy some great little bags out of this! You can always sew a button to the inside, too, using the same steps, and then your bag will be reversible!

The matching wallet tutorial is coming next!

Friday, February 10, 2012

Project #9: Recycled T-Shirt Tote Bag!

Last night, I went through all my clothes, preparing to donate the first round of my 212 things in 2012. I'm pretty sure I've found about 75 things so far... Anywho, I found this really cute t-shirt that I bought a few years ago that I have never fit into, so I decided I was going to recycle it into something fun!

I figured that the best thing to recycle a "Green" t-shirt into was a reusable tote bag, and I set out to create one without using a pattern. I had one baby nap to do this in and didn't have the patience for printing, cutting, reading, etc.

BEFORE! I definitely wanted to keep the panda, because he's absolutely adorable!

Step 1: Cut off the bottom of the shirt... I cut it off at the bottom of the words, making sure to keep some space below the words and above the panda for seams, etc.

Step 2: Cut the sleeves off at an angle.
You can also just do a straight line up and down your bag, but what fun would that be?

Step 3: Cut across the top of the shirt to the length you'd like your bag to be.
Again, I cut above the words so they'd be included on the bag.
I didn't want to go any higher because then the opening in the bag would be really small.

Step 4: Defy logic. With the shirt right-side-out (RSO), sew a straight seam across the bottom.
Do this at both of the "sleeve" openings, too.

Step 5: Turn your shirt inside out. Where you sewed your straight seams at the sleeves and bottom, sew a zig-zag seam.
Make sure you are sewing in far enough so that your seam from step 4 will be hidden when your shirt is RSO again.

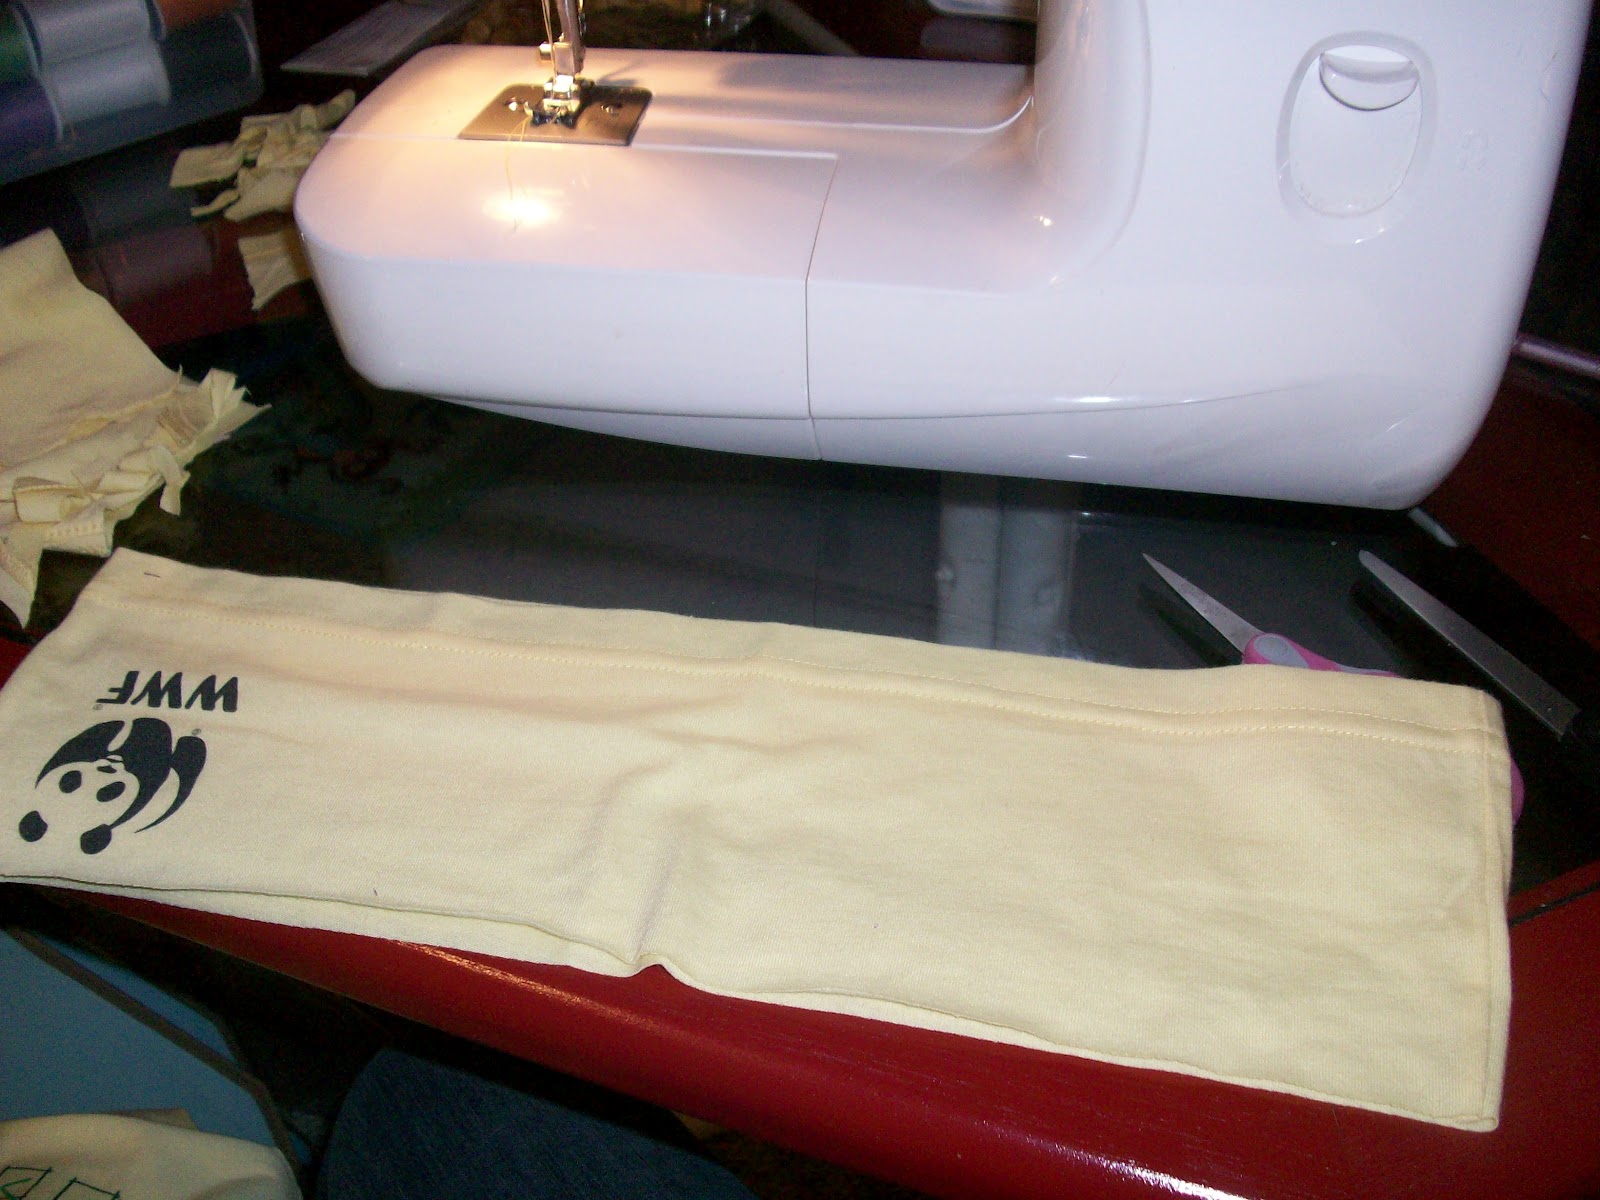
Step 6: You can skip this if you want, but I wanted to add a pocket to my bag. I took the sleeves, and cut the seam (the one that goes up the underside of your arm) out so the sleeves lay flat. Then, trim the excess fabric.
(Please ignore the fact that it looks like a pair of underpants.)

Step 7: With the sleeve "pocket" RSO, sew a straight seam along the "sides" and "bottom."
Since this is a half circle, there aren't really "sides," but you know what I'm trying to say!

Step 8 (Not pictured): Turn your sleeve "pocket" inside out and zig-zag stitch, like you did in Step 5. Again, be sure that you are sewing in far enough that your raw edges won't be seen when you turn your sleeve pocket RSO.

Step 9: Because 1 pocket just isn't enough, I made my pocket a 2-part pocket. This is easy. Just sew straight down the middle of your pocket (RSO!) with a straight stitch. Or, instead of sewing down the middle, figure out how wide your cell phone/ID is, and sew to fit. If the other part of the pocket is really narrow, it's OK. Lip gloss needs a pocket, too!

My cell fits in both sides!

Step 10: Just as you did earlier with your sleeves, take the bottom of your shirt and cut the end seams off. You will have a "front piece" and a "back piece."
This will provide you with your straps!

Step 11: Take JUST THE FRONT PIECE of the bottom, and fold it so it is inside out. Using a secure stitch (either a tight zig-zag or short straight stitch) sew one end and the un-folded edge closed. Through the open edge, turn your strap RSO. Fold the unfinished ends inside and stitch across. (I used a tight zig-zag).
Step 12: Repeat "Step 11" with the back piece. This will give you two straps.

Step 13 (Not pictured): attach one end of each strap to opposite ends of the bag. Sew, button, etc, however you'd like. Tie straps at top when you are finished for a quick, easy, cute T-Shirt Tote!


BEFORE AND AFTER